When you share your computer with others, you risk them making changes you’re not happy with. You could tell them not to make any changes, but they can forget or directly not listen. But you can ensure that no unauthorized changes are made by disabling the Manage option under the This PC option. The process may sound complicated, but by taking it one step at a time, you’ll see there is nothing to worry about after all.
How to Turn on/off Manage Selection Under This PC in Windows 11
There is one foolproof method you can try to disable or enable the Manage selection under This PC. You can choose to do it using the Registry or by using the Group Policy Editor. Make sure you run them as an administrator. Let’s start by seeing how you can disable/enable the option using the Registry. The changes are made automatically, and there is no need to restart your computer.
Group Policy Editor
Open the Group Policy Editor by searching for it in the search bar. Once it’s open, go to the:
- User Configuration
- Administrative Templates
- Windows Components
- File Explorer
Look for the Hides the Manage item on the File Explorer context menu option. If you don’t see it, you can always scroll all the way down and choose All Settings. It’ll be there.

Double-click on this option and make sure that the Enable option is chosen. Click on the OK button to save your changes. There is no need to restart your computer to see the changes. You can even have the Group Policy Editor open to check if the changes have been made. So if you change your mind, you don’t have to start the steps from the beginning. Once you’ve followed the steps above, you might want to check if the option has been disabled.
Checking to See if the Changes Have Been Applied
You can check if the Manage option is gone by going to the search bar and typing This PC. When it comes up in the search results, you won’t see the manage option anymore. It should be the second option from the list of options. You can also check by going to File Explorer, and it will be below the Screenshots option. Right-click on it, and you won’t see the Manage option anymore.
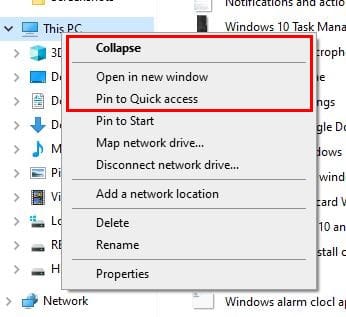
On my computer, the Manage option was the second one from the list, but after making the changes mentioned in this tutorial, it’s no longer there, as you can see. That’s all there is to it. If you ever change your mind and want the Manage option back, follow the same steps and disable the option. And just like the first time you did it, you won’t have to restart your computer since the changes will be applied immediately.
Further Reading
You can do other things with the This PC option on your computer. For example, check out this article to see how you can pin This PC to your taskbar. Then there is the article about how you can manage your organization’s updates too. If you use This PC frequently, you can also make your computer launch it. Here are the steps to follow. There are various other articles you can read. Ensure to use the search bar to look for a specific topic.
Conclusion
One way you can avoid others from meddling with your settings is by removing the Manage option from the My PC option. Don’t worry about permanent changes since you can always change them later. This is a method that will also work for your Windows 11 computer as well. How easy was it for you to remove the option from your computer? Share your thoughts in the comments below, and don’t forget to share the article with others on social media.