LastPass may occasionally throw a strange “Invalid response” error when you’re editing password details. Interestingly enough, this error seems to affect Chrome more frequently than other browsers. If you already refreshed your browser and restarted your computer, but you’re still getting the same error, follow the troubleshooting steps below.
Why Do I Get Invalid Response from LastPass?
Update Your Browser and Disable All Extensions
Make sure your browser is not causing this error. If you’re running a Chromium-based browser, go to More options (the three dots), click on Help and select About. Update your browser to the latest version.

Then, disable all your extensions except LastPass. Maybe one of your browser extensions is interfering with LastPass. Click again on More options, select More tools and then click on Extensions. Manually toggle off your extensions.

By the way, if you’re using a VPN, temporarily disable the tool if you don’t really need to be behind a VPN.
Switch to a Different Browser
“Invalid response” errors usually affect Chrome users. If you’re looking for a quick solution, switch to a different browser and check if you can edit your password details. Many users confirmed these errors rarely affect Mozilla Firefox. Launch Firefox and check if you can successfully complete the action that initially triggered an invalid response on Chrome.
Kill Active Sessions and Log Out
Kill all the active LastPass sessions associated with your devices. You can do that using the web browser extension or the online web Vault.
How to Kill LastPass Sessions Using the Browser Extension
- Go to Account Options and select Advanced.
- Click on Other Sessions.

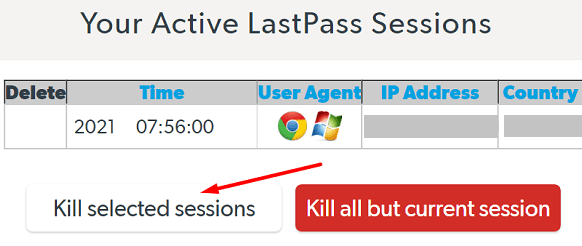
- Select Kill selected sessions and tick the checkboxes for each session you want to close.

- Then click Kill checked sessions.

How to Kill LastPass Sessions Using the Online Web Vault
- Open a new browser tab and go to https://lastpass.com/?ac=1.
- Log in and go to Account Settings.
- Click on the General tab.
- Click Show Advanced Settings.
- Go to Tools and select Destroy Sessions.

- Select Kill selected sessions.

After killing all the processes, log out of LastPass. Wait for 30 seconds, log back in and check if the error persists.
Clear LastPass Local Cache
Delete your local LastPass data. You can quickly recreate the data folder by logging out of LastPass and then logging back in.
While logged in to your LastPass browser extension, click on the LastPass icon and go to Account Options. You can also click on your email address. Then go to Advanced and click on Clear Local Cache.

Update Your LastPass Browser Extension
Make sure you’re running the latest LastPass browser extension version on your computer. First, download the latest version of the LastPass extension from LastPass’ official website. Log in and check if LastPass is still throwing up invalid response errors.
Grant Lastpass Access to All Sites
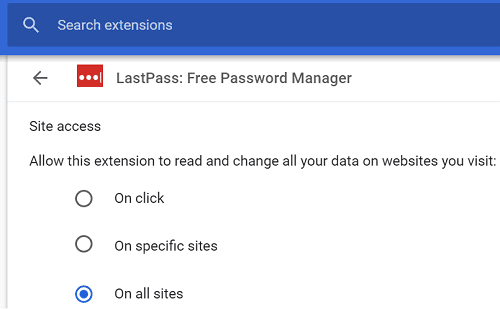
Make sure LastPass can access all the sites you’re visiting.
- Open a Chrome tab and navigate to chrome://extensions/?id=hdokiejnpimakedhajhdlcegeplioahd.
- Scroll down to Site Access.
- Allow LastPass to read and change website data On all sites.
Conclusion
To fix LastPass “Invalid response” errors, update your browser and disable all extensions except LastPass. Switch to a different browser and check if the error persists. Additionally, kill all your active sessions and log out of your account. Then, clear your local cache and update the LastPass extension. Don’t forget to grant LastPass access to all the websites you’re visiting. Which of these methods worked for you? Comment below.