File History is a handy Windows 10 feature that allows you to back up and restore your files in case something goes wrong with your computer. As a quick reminder, File History replaced the Backup and Restore feature as Windows 10’s main backup tool.
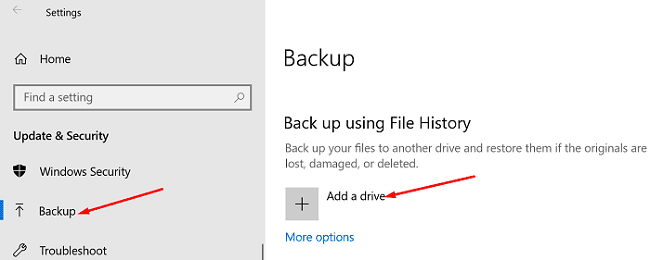
To enable this feature, go to Settings, click on Update & Security, select Backup, and then hit the Add a drive option. You can then select an external drive or network location to save your backups.
If you want to get your files back, type “restore files” in the Windows Search bar and select Restore your files with File History. Locate the file you want to restore, and hit the Restore button.
As you can see, backing up and restoring your files with File History is a pretty simple process. Unfortunately, the tool may sometimes fail to create backups for your files. When this issue occurs, errors 200, 201, or 203 often appear on the screen. Let’s see how you can quickly fix this issue.
How Do I Fix File History Errors 200, 201, or 203?
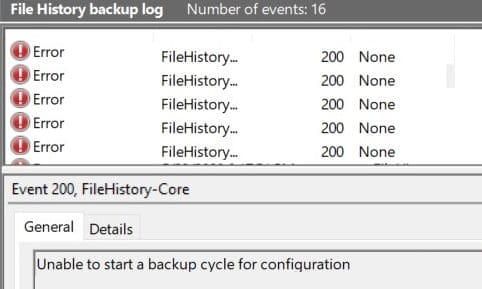
Check Your Drive for Errors
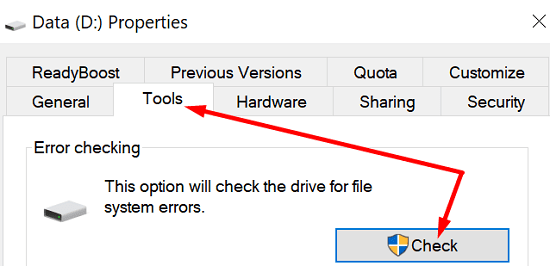
If your drive got corrupted, File History won’t be able to start the backup cycle. Right-click on the problematic drive, select Properties, go to Tools, and then select Check drive for errors.
Restart your computer and check if the error persists. Don’t forget to check for OS updates if you’re running an outdated Windows 10 version. Go to Settings, select Update and Security, click on Windows Update and check for updates. Check if you notice any improvements after installing the latest OS release on your machine.
Run DISM and SFC
You can also use Command Prompt to automatically scan your drive and repair the errors that are preventing Windows 10 from backing up your files.
- Type CMD in the Windows Search bar, right-click on the Command Prompt app, and select Run as administrator.
- Then enter the command below making sure to press Enter after each one:
- DISM.exe /Online /Cleanup-image /Scanhealth
- DISM.exe /Online /Cleanup-image /Restorehealth
- DISM.exe /online /cleanup-image /startcomponentcleanup
- sfc /scannow
- Restart your computer and try again.
Run Disk Cleanup
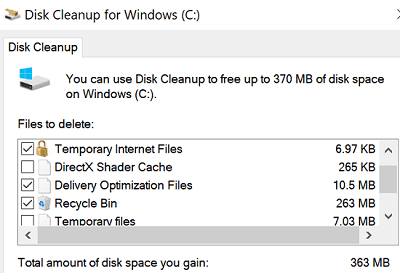
Disk Cleanup is a very handy tool that allows you to automatically scan your drive for redundant files. For example, you can free up a few gigabytes of storage space simply by removing temporary files. By the way, these files may sometimes interfere with or even block various computer processes.
- Type disk cleanup in the Windows Search bar.
- Launch the DiskCleanup app, and select the drive you want to scan.
- Then select the files you want to remove and hit OK.

- You can also use the Clean up system files option.
Rename Your Files
Maybe there’s nothing wrong with your drive. A single problematic file or folder can block the backup process for thousands of files. Try to identify the culprit by backing up your folders one by one.
Then check your files and make sure the file names don’t contain special characters. Additionally, ensure the file name or file path are not too long.
For instance, some users noticed that File History often fails to back up files that have URLs in their names. Try renaming the problematic files and check the results. For example, if you have a file named music bestmusic (downloadyourmp3.com).mp3, rename it to bestmusic.mp3 and check if error 200 or 201 still arises.
Run the File and Folder Troubleshooter
The File and Folder Troubleshooter automatically repairs your files in case you’re unable to copy, move or delete them. You can download the tool from Microsoft. Install it and follow the on-screen instructions to repair your files. Then check if File History can successfully back up your files.
Use a Third-Party Backup Tool
If the problem persists and you really need to back up your data, you can install a third-party backup tool to get the job done. We suggest using a free tool because there’s no point in paying for backup programs as long as Windows 10 can take care of that task for free. We’re sure it’s only a matter of time until you manage to troubleshoot the problem.
Some of the most reliable backup tools for Windows 10 include Macrium Reflect, Acronis True Image, Aomei Backupper, or Paragon Backup and Recovery.
Conclusion
If File History fails to back up your files with errors 200, 201, or 203, check your drive for errors. You can also use the DISM command to scan and repair your files. Then check your file names and run the File and Folder Troubleshooter.
Did you manage to troubleshoot these errors and restore File History’s functionality? Let us know in the comments below.