Everyone who’s used a USB memory device has dealt with the prompt about needing to “Safely eject the USB memory device”. The system never really explains why this is necessary though, and in most cases, it seems that doing so is unnecessary, which can lead to confusion over what safely ejecting a USB device does and if it’s really needed.
Why is safely ejecting necessary?
When writing data to a USB drive, not all data is copied across immediately. In some cases, data is cached in RAM or on a hard drive and then transferred to the USB memory stick when it is less busy. Before this cached data has been transferred onto the USB stick, it is vulnerable to corruption if the device is suddenly removed, or if the power is cut.
Safely ejecting a USB device is a process that ensures that all data is written to the drive so that there’s no risk of data loss. In some cases, this process can take time, especially if a large amount of data needs to be written or if the drive is particularly slow.
Quick removal
Quick removal is a setting that can be applied to USB drives. If it is enabled, then all data is automatically written straight to the device during any transfer. Once the notification of transfer is complete the device can be instantly removed without needing to safely eject it first. Quick removal is generally enabled by default on USB memory sticks.
If quick removal is disabled then transfers will be shown to proceed quicker, while actually writing some data to a cache for transfer later. To protect against data loss, devices with quick removal disabled should be safely ejected before removal. Leaving quick removal disabled enables write caching to provide better performance. Quick removal is disabled by default on large USB storage devices such as external hard drives.
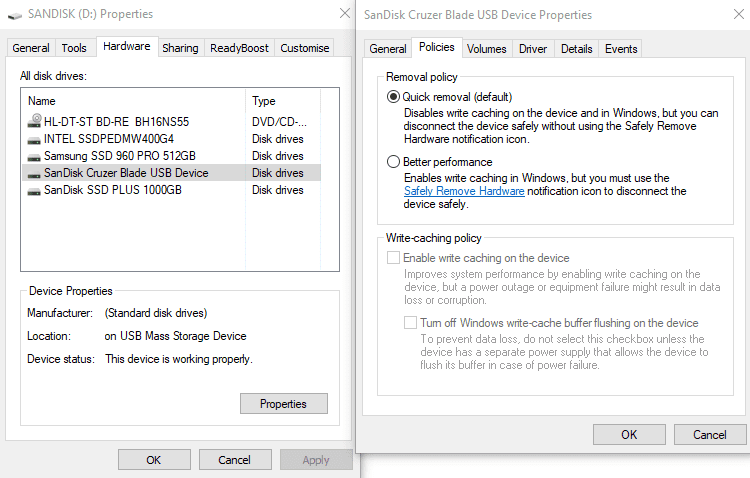
You can manually enable or disable quick removal on removable storage devices by configuring the device properties. To do so, you need to right-click on the removable drive in File Explorer and select “Properties”. In the properties window, you need to switch to the hardware tab, select the drive again, and click “Properties”.
In the new properties window, you need to click on the “Policies” tab. If this tab is not present you may need to click the “Change settings” button in the “General” tab. In the Policies tab, you can select between the “Quick removal” and “Better performance” modes with the radio buttons and click “OK” to apply the settings.